One of my favorite terms in blogging is “Ham Fisted Woodworker”. To me it has many meanings, but for today it refers to how we all can just turn off our brains in hopes of achieving fine woodwork by way of brute force.
Using a mallet of any kind paired with a chisel is a complex algorithm of weight/force/mass/and powdered unicorn dust. I won’t pretend to understand it, and I’m also not going to allow any “It’s simple physics” talk either.
What I can simplify it down to is this. When you hit something, it will either collapse and absorb the energy, or it will resist collapsing and transfer the energy into forward motion.
I’m not a Physics Major so relax! I’m close enough to get through this post.
Chisel handles dent or split when more force is applied to the handle than the wood the handle is made of can transfer into forward motion.
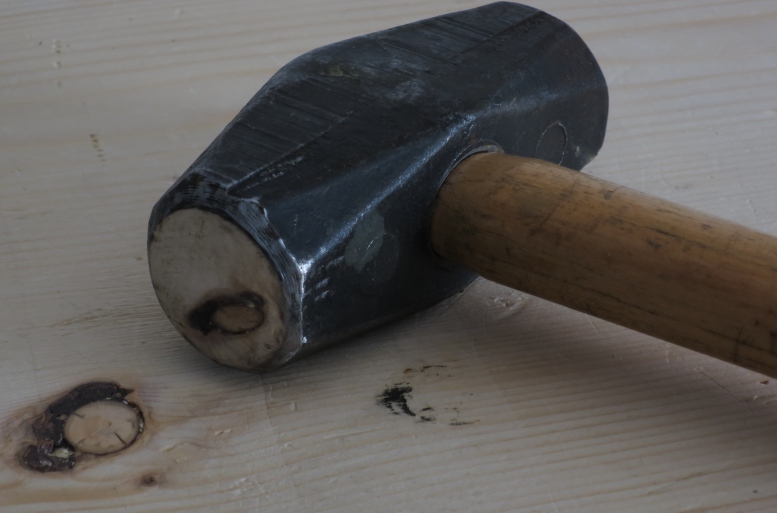
A couple of weeks ago I finally fired up a 1/2″ mortise chisel I bought nearly 10 years ago, and went to work with it and my 3lb sedge hammer. I was surprised to notice that the chisel handle quickly started showing dents. Why was this happening? While wondering that I had a flash back to the time I watched a friend mushroom a chisel handle in front of me. He wailed on that poor chisel like he’d found it in bed with his mother.
And that’s when it occurred to me. Mallets don’t ruin chisel handles, Ham Fists do.
The design of a chisel is for it to cut. It will resist cutting if it is too dull, or if you try to take too big of a bite. Your chisel handle will dent when the tip of the chisel is saying “I can’t cut through that”, while your ham fist is saying “THE HELL YOU CAN’T”.
For some people it’s Mongo, others Lumpy. Many would say Maul, or Sledge or even Mini Sledge, but really, I’ve always know it as “The Right Hand Of Truth”.
Not in public per say, but on a one on one level, I have to admit, this little guy doles out truth with every blow.
It was one of the very first tools I decided I needed, and chose all on my own when I first started in construction. Being the new guy, I was the first to be volunteered to do whatever needed to be done in an awkward, small or confined space, and those of you who know me will know that there are not many small spaces that I would fit easily into. So especially when it comes to demolition in a small space, this little sledge made the best out of a bad situation.
Come to think of it, there could be an argument for this being my most used hand tool that I still own, and there are very few that date that far back that have not fallen out of favor…
The thing is, only until recently, I have looked at it as a second class hand tool. One that should only live in the garage, or if ever in my shop, safely stowed away in a metal tool box so as to not offend any of my good, real, WOODWORKING hand tools.
But then the usual kerfuffle from the usual people start throwing around big claims that Mongo is perfectly at home on a decent woodworkers bench!
OH THE HUMANITY! OH THE DAMAGE IT WILL DO TO THE BENCH THE CHISEL HANDLES THE HOLDFASTS (that hold the historically inaccurate notched batons).
WHAT WILL PEOPLE SAY?!!?
And as usual, the nay-sayers were challenged to try it on their un-toothed benches, and on their chisels, but obviously not on their hand planes so carefully placed on their sides so the blades would not be damaged by the work bench…
But for the most part, the nay-sayers could not hear them over their own saying of nay.
I however, fool that I am, yet again chose the road less traveled. You know the one, where you look at an idea, and figure you may as well give it a try, even if it’s just to prove one side or the other wrong?
I love telling people they are wrong. I don’t need to be right, but I love it when others are wrong!
Anyways, I tested the water with my hold fasts.
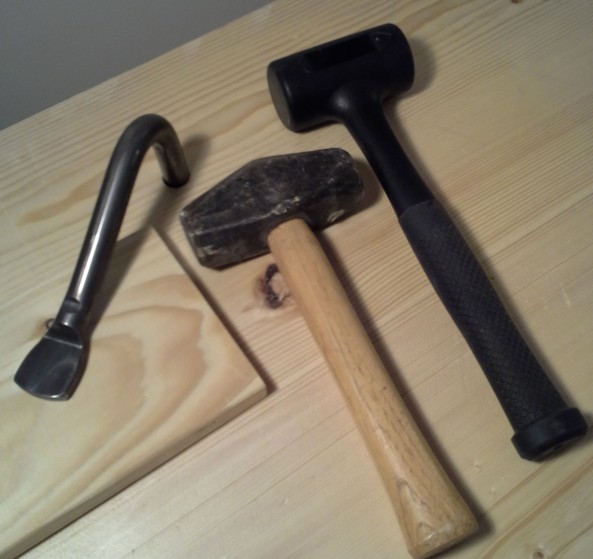
I’d been using my deadblow mallet to set and release my holdfasts since I got them, but I was an instant convert to old Lumpy over there. It just has so much mass behind it that you really don’t have to hit it hardly at all, and the hold fast is set. To release it took no wind up to knock it loose, and that was a big win when the hold fast is at the back of the bench and very near the wall. My dead blow was useless in that case, but not for lill’ old Maul’er.
The problem I did run into was that this little guy had seen a pretty hard life. If I was smart I would have taken a picture of how pitted and scarred its faces were.
Surgery took the better part of a day starting with a drum sander attachment on the rotary tool. Then to careful work with my 1000, 4000, 8000 norton stones, and then finally green honing compound on a felt wheel to bring it to a nice shine.
At that point and only at that point was I ready to try whacking a chisel with it.
And that’s where it really, really clicked for me.
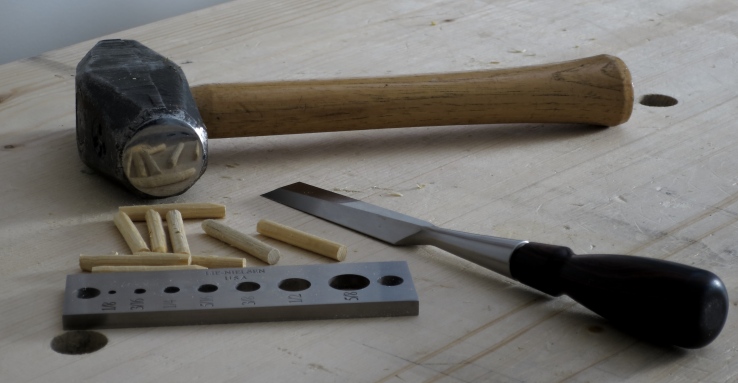
Chisel whacking is what you do when there is not enough mass behind the strike, and that is why you should never use a regular hammer on your chisels. For a hammer to really make the chisel move, it has to compensate for its lack of mass with speed, where as a sledge only just has to be moving to provide the same force. A light tap tap, is almost overpowering and took a little time to get used to, but man! It’s pretty impressive. I’m going to keep using it for a while just to see if I keep liking it, and also I’ve noticed that there are not a lot of entry level chisel mallets to recommend to new woodworkers on a tight budget. Perhaps the Right Hand of Truth could be the perfect affordable option..?
So then today I’m making some dowels for drawboaring, and I remember how the last time a lot of them split and were ruined by my carpentry hammer…
Yet again, the slow moving mass made this a painless endeavor.
But don’t take my word for it.
Try it for yourself.
Side note…
Hey, check it out! Fairwoodworking turns freekin’ 5 tomorrow!
Yes I know, much has happened in the past week, and yet again I am at the center of it. I hate to brag about it since I’m sure you already know. I understand how the Monday morning water cooler talk was all a buzz about where you were, and what you were doing when you learned that Fairwoodworking became the Dovetailing Champion Of The World.
You already know about all that, so I need not mention it.
Well I’ve come to learn that winning was the easy part. The parades, the ceremonial mall openings, the charity golf tournaments and working the international talk show circuit (I’ll admit my Mandarin is a little rusty), meeting with government officials and running from all my new found dovetail groupies. It’s not a life I’m familiar with, but don’t worry.
I’m still Jenny from the block.
I’m not changing and neither is the blog.
Well. Not much anyway.
I’d prefer it if you did call me Champ, and also please don’t look at me directly. Oh. And only speak in hushed tones.
The blog will remain fully accessible to all… that pay their subscription fees on time.
Yes it’s business as usual here at “Champion Of The World Woodworking”.
Did you guys catch where I compared myself to J-Low?
She wishes.
Are you buying this?
I’m certainly not.
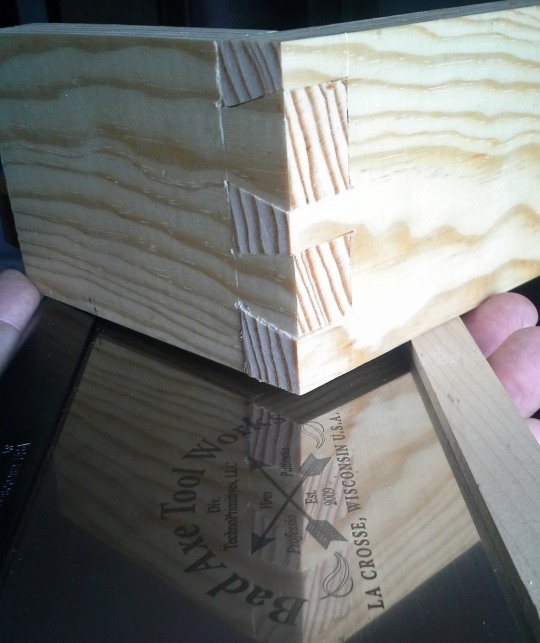
While I greatly appreciate the donated prize of a 14″ BadAxe Sash Saw, I really don’t get how a 5:41 time with a 2 card deduction won. You can argue that I’m being modest, or more accurately falsely modest, but I assure you that you have misunderstood. I think my results under the gun, with people watching was fantastic. My only goal was to perform at a level that I could look back on and know I had done the best that I was capable of. Oh, and I really, really, REALLY wanted to better my good friend Neil Cronk.
Done, and DONE!!!
By the narrowest of margins (1 second and 4 point deductions) I win, and this time you can’t claim to have the nicer fit.
EDITORS NOTE – If the next time I’m spotted in public, I have shards of an award winning stool sticking out of the side of my head, don’t call the police. I deserved it…
The thing is I am not especially talented, and also anyone who has seen me work at anything knows I progress at a snail’s pace. I’ve been working on the same chest of drawers for over a year now, and I’ve yet to finish the carcass. The only things I brought to the table was the accumulation of two key skills, a well thought out game plan, and an average of cutting two joints per day for 14 days.
If there is one thing I can brag to the world about it’s that I came prepared, but by that logic, I should also be bragging that every day I manage to leave the house with both my shoes on the right feet.
I should not have won this event, and if I get the chance to compete again, I hope I am obliterated by one of you out there.
Then I’ll crack you on the head and steal your prize!
So let’s see if we can’t bring this in for a landing.
After the completion of the Handtool Olympics, I got a chance to thank Mike Siemsen personally for running the competition. As we talked I commented that as fun as it was to practice and then compete, such a rushed process has no real value to real life dovetails or woodworking. Mike very kindly stopped me right there and in words I have now forgotten, he essentially told me, “you’re wrong, you’ll see”. Since that time I’ve had some time to consider it, and I now believe him to be correct.
Even if you never compete in a dovetail race, you can learn from it, and in the next while I hope to share with you the skills and strategies necessary to cut a fast’ish dovetail.
The first two skills I mentioned above.
Learn how to start a square cut free hand. (for cutting the tails)
Learn how to cut straight down free hand. (for cutting the pins)
If you are looking at this skeptically, hoping that I will tell you that “You can do it big guy!!!”, don’t bother, you can’t.
However, if you are willing to try, and fail, and try, and fail, and keep trying until you succeed? Who knows what will happen.
Either way, hand wringing 101 is one blog over from here.
Additional thanks to Popular Woodworking for a great Popular Woodworking in America I hope to come again next year!
HEY! WAIT A SEC! WHO SORTED THESE GUMMIE BEARS!!??!!
One thing I can’t really stand is the opinion of someone based on their first impressions because how I expect something to function for me can be way, way different from how it will actually function.
What I’m saying is, Love at first sight can easily fall prey to the seven-year itch, and it’s interesting how expectations are tempered by the test of time.
So lets compare today versus what I had as expectations last year. You can read about them HERE.
One year ago today I was taking a class in Warren Maine building what was to be my second Dutch Tool chest, having just finished building my first DTC to house the tools I needed to bring to said class.
I really didn’t need or want a second chest, but it was a great opportunity to take a class taught by my #1 man crush in the red shirt. In the end I decided that if one DTC is good, two would be better since I seem to be a minimalist with a hording disorder.
So 1 year later, how are things going?
One of my big requirements for a chest was portability. Not moveability from one corner of the shop to the other, but out of the shop, up the stairs down the hall, out the door, up the driveway, and into my truck. Then from my truck, across the parking lot (in the rain) up the stairs, and into my hotel room. The following morning, back down to the truck, across another parking lot, through the door, up the stairs, snake my way through a bunch of sweet Lie-Nielsen benches to the furthest corner (what was I thinking). All to be repeated two days later in reverse.
Portability?
Check!
Splitting the chest into two pieces was a very good call. If you are reading this post and considering building a DTC, build it in two pieces. An additional benefit of this small design change is the ability to grab just the top part for a quick visit to a friend’s house or a day class. The top half is easily capable of holding enough tools to keep you busy for a day.
But here is the down side. Just because a tool chest is capable of containing a large quantity of tools, does not mean it’s nice to work out of. A chest packed full of tools quickly begins to feel more like the kitchen junk drawer we had as a kid. If I have to pull 5 things out to be able to see the tool I want, I will quickly become frustrated, but we will get to that later.
Last year I praised the design of the lower shelves, and mocked the sloping lid of the upper half, and it all seemed well founded. Boy was I wrong. Well, to a point.
When we all first were introduced to the “Anarchist” tool chest, one of the most common negative observations was that nobody in their right mind would be happy stooping down to reach into the bottom of the chest. The thing is, before stooping down, you can look directly down at the tool you are after, and then with one hand resting on the side of the chest, reach down with the other hand and grab the tool. With the shelves of the DTC, you must stoop down just to see some tools, and there is no place to lean against as you do it. Often times to look into the very back of the bottom shelf I find myself down on my knees. That was not the plan…
On the other hand, the upper part with its ridiculous slopping lid has been a very pleasant surprise. The ability to look down at my tools is wonderful, but I have to admit the top access has actually turned me more and more on to the English style chest with sliding tills. Trouble is, tills add weight, and weight lowers portability.
Well shortly after my trip to Lie-Nielsen, I was faced with the challenge of moving my entire home over 5,500 km (3,400 mi) across the country. This was a great test on how the chest packed into a truck with a whole mess of other prized possessions. Did I mention that the DTC has a sloping top? I have to admit, I found it challenging to say the least to pack efficiently around this heavy chest with a stupid sloping top. The Dutch Tool Chest does not play well with others…
So let’s get back to the whole capacity thing. When I look at an open space in a tool chest, I just can’t help but want to try to fit another tool in there, you know, Tetris style, but then to access many of the tools, you nearly have to empty the entire chest, leaving your bench covered in tools. When you cut back the number of tools in the chest to the point that you can grab any tool without having to lift any other tools, the chest looks barren and under utilized. Finding that happy medium has been a challenge. Really, I think I just have too many tools, but I’ll deny it if you tell anyone, and that may be my biggest problem with the DTC. It suits a very limited, very lean yet functional collection of tools. Meanwhile, my idea of having a second DTC to hold my additional nick-knacks and misc oddities is an oddity in itself. The second chest is wasted as a catch-all for peripheral odd shaped widgets as it is odd shaped itself based on a very specific set of tools in the first place.
All in all, I still think the DTC is a very good design.
Its strengths are in its day to day portability, and smaller footprint than an English floor chest.
It struggles with larger tool collections, and as cargo. It’s also not ideal for people who don’t like bending over to get access to the lower shelves.
So the other day I was listening to an old Fine Woodworking podcast (I’ve been listening to them from the first), and this same old listener mail question reared its ugly head yet again.
If you could only have 3 planes, what would they be?
I’m really tired of this question for a number of reasons, but I decided to listen to their answers anyway.
1. Block Plane
2. Smoother
3. Shoulder Plane
For what it’s worth, this is a good list of planes. I can’t say that it is incorrect for what I know of their type of woodworking.
BUT!
It’s a terrible list for my workshop, and that is one of the reasons I don’t like this question.
For a shop ruled by power tools, a shop that has no hand tools, these three planes could really up the game of the woodworker at the helm.
In a shop where almost nothing is done with power tools, this list is both redundant and inadequate at the same time.
That may be harsh, but let’s have a look at what Fairwoodworking of today would say to baby Fairwoodworking elect.
Firstly, to dimension wood you normally use 3 planes, the Jack, Jointer, and Smoother, but that’s just for dimensioning.
At the same time joinery has a its own stable of planes, but we only get to have 3 total.
Then there are planes we use to clean up cuts, break hard edges, and plane end grain. Typically we’d use the block plane, but imagine if you were to reach for your block plane and discovered the blade was far too dull to use, but you needed it now, and you forgot your sharpening gear at your friends house. What plane would you use as a substitute?
In my shop I’d turn to my Smoother.
And if I was to do without one of my bench planes for dimensioning, would I drop the Jointer, or the Smoother? No. I’d have to do without the Jack. I wrote about this a while ago, by using a modern thick blade in an old smoother for smoothing tasks, you can then swap to the old blade with a “Jack plane” like camber for rough work. The difference in thickness of the blades will remove the need adjust the frog for the two vastly different tasks.
I’d hate to ask it of my smoother, but it could get by doing 3 jobs in my shop.
The Smoother gets my first vote.
But the smoother won’t do so well as a jointer unless we are dealing with really short boards, and the more traditional jointer is really difficult to find a suitable substitution. Thankfully, the Jointer is also excellent in the role of both a Shooting Plane, and a boat anchor.
The Jointer gets my second vote. Not so much for what it can do, but for what every other plane can not.
With one plane left, how will we address joinery?
I guess I’d offer the router plane. It’s great at cleaning out the bottoms of grooves and dados, I love mine for mortising hinges, and some people use it for cleaning the cheeks of their tenons. My Veritas router plane has an optional fence that would make it work as a marginally functional plow plane, so there you have it.
Plane number three is the Router plane.
To recap.
1. Smoother plane
2. Jointer
3. Router plane
These are the 3 great planes I would choose if I could only have 3. And dare I say,
If the world was in jeopardy, and the only way we could save ourselves from alien destruction was the faint hope that I could build a box with these and only these 3 planes…
I will be your hero!!!
But like most of the free world, aliens don’t give two craps about what I build, and so I build for fun.
And that is why I hate this question.
Three planes is not fun.
Three planes is the opposite of having the right tool for the job.
Three planes is for some kind of weird “bang for your buck” collector types.
OR
Three planes is a good place to start, and a terrible place to stop.
But really, DON’T go out and just buy 3 planes because of my or any other recommendation. Buy one plane. Probably a block plane or a smoother. An old Jack plane would be a great first plane as well.
Yes I realize that 2 of these 3 planes did not make the list, but that is because the 3 plane list is simply idiotic. If you are interested in planes, get one. Learn how to use it. Learn how to sharpen the blade, and use it until you can see what job it is not the right for. Then figure out what is the right tool, and look at getting it.
And save the lists for Americas Funniest Home Videos.
As many of you may know, I’m pretty much a hand tool guy. I rarely talk about power tools, and if you are familiar with me on the Twitters, I’ll mock incessantly anyone that dares admit to using them.
But I really don’t have a problem with people that use power tools. Power tools are great for those that enjoy using them. The hours that I suffered through (more accurately neglected) wearing safety glasses, hearing protection, and dust masks, turned me off power tools years ago. However, there are countless woodworkers that build amazing pieces with nary a hand tool save maybe a pencil.
I do however have a problem with the use of a common new term used by many hand tool users.
The Tailed Apprentice. As in how the masters of old tasked the young apprentice with grunt work, we as the modern shop master task our tailed apprentices with the lower beginner skill work.
As best as I can see it, the idea of the tailed apprentice was formed as a counter argument to the statements that using power tools is cheating, but really both arguments miss the core issue.
If you go to a track meet, you will see runners line up at an oval track. When the gun goes off, the race is on, and the runners head down the track. If one of the runners cuts across the middle of the track he would be considered a cheater.
In this scenario, running is NOT like woodworking. You can’t cheat woodworking. The final product is the finish line, but how you get there is up to you.
However, if you went to that same track on practice day two weeks before the meet, and you saw a runner practicing for the 10,000m but was cutting across the track so they only had to run 5,000m, who is being cheated? At the meet, this runner will have an amazing first half of the race, and a rather rough second half.
The runner cheated his or herself as they clearly only wanted to run 5,000m but chose to sign up for an unrealistic event.
If you have no desire to learn how rip wood by hand, that’s fine, but your table saw is not then your apprentice.
If learning to resaw by hand does not fit into your idea of a fun hobby, I can understand that, but to call your bandsaw a tailed apprentice is disrespectful.
My knowledge of the old apprentice system is not great, but I think I’m safe to assume that the average Master Cabinet Maker or Joiner had already put in his 10,000 hours of ripping, resawing, flattening, thicknessing, sweeping, and glue-pot cleaning. Nobody relishes accepting that they are still a lowly apprentice, but the true master earned the right to become a Journeyman, and then earned the right to be called the Master.
And now, I told you that, to tell you this…
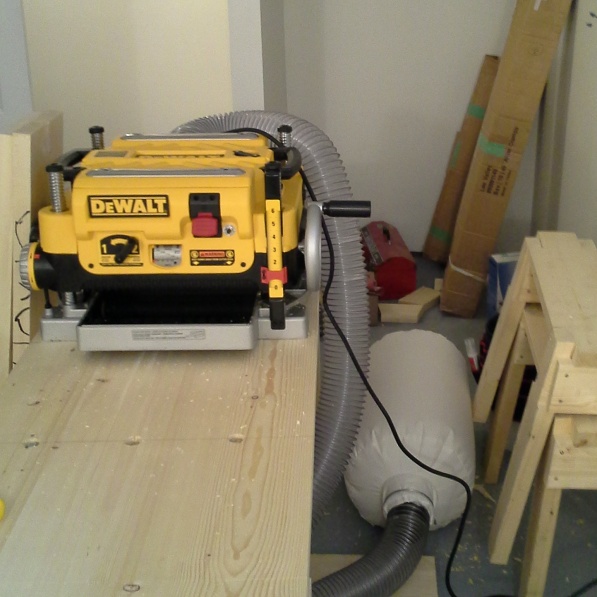
I recently bought a thickness planer.
You see it’s been almost 9 years since I dimensioned my first piece of wood entirely by hand.
I know I don’t know everything there is to know about dimensioning, and I’m nowhere near my 10,000 hours, but I feel I’m near enough to the top of the learning curve for my needs. Considering the limited woodworking hours I still have on this earth, there is still much to learn in other aspects of woodworking, and I’ve discovered that stock preparation now is interfering with my ability to learn. Thicknessing is just one step in dimensioning wood, but I think it is one of the more time consuming.
Think I’m splitting hairs? That’s fine.
In your shop you can call it a tailed apprentice, but in my shop it’s a learning aid.
OK, rant over.
Wanna’ know the first few things I was aided in learning?
1. Thickness planers are awesome!
2. Chip ejection impellers are powerful.
I first hooked it up to my Wet/Dry Shop-Vac, and soon discovered that the impeller trips the mechanism that protects the vac motor from water if it tips over. With the motor blocked, the impeller is powerful enough to pop a latch on the Shop-Vac canister, and spew chips throughout the entire shop.
What a mess!
In the end (as shown above) I’ve attached a hose to a dust collector bag, and this seems to work amazingly well.
If a students shows me the floor during class and asks: “Should I s….”
I cut them off. “Yes.”
I have found that when you ask yourself if your floor is dirty, the poor pathetic thing is way past being dirty and is on its way to getting covered with trash. I think you need to sweep a floor before it actually occurs to you to sweep that floor. Sounds impossible, but it’s not.
I sweep a lot, and it is part of the rhythm of my day. As I finishing planing up panels with a jointer plane, I stop to sweep the floor before I take on the parts for the lid – even if the floor is performing well.
When I chop dovetails, I touch up the floor between each corner of a carcase – even if the floor is clean and doing well.
This is the opposite of the way I was taught to evaluate floors. I was told: “The surface of the floor will tell you how your floor is performing. If the floor looks bad, it’s time to sweep.”
While that makes sense on one level, I don’t want the floor to ever look bruised or scraped or chunked out. So I sweep the floor several times a day.
This approach not only ensures my floors will look their best, it also removes most concerns about what material your floor is made of. If you keep a floor wicked clean(and nothing less) then it really doesn’t matter if a wood floor stays clean longer than concrete.
So shut up and sweep.
Editors note – Some of you may be thinking this is quite possibly the dumbest thing I’ve ever written, and you people are what I like to call “wrong”. The above post is actually a near direct ripoff of a recent post over at Lost Art Press. The idea made me laugh more than any sane person should laugh about their own joke, but that is just how I roll.
Deal with it.
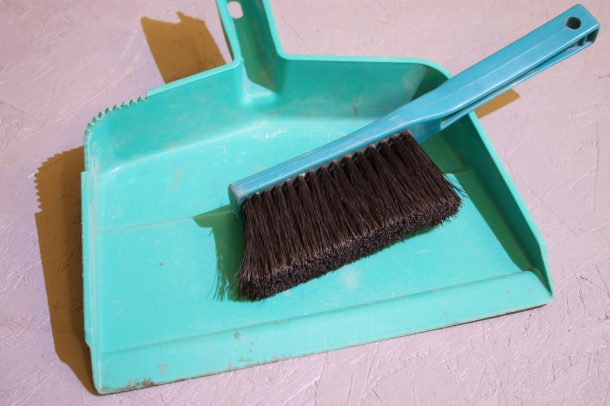
The truth is I was getting ready to talk about ultra sexy topic of sweeping anyways, and the above “upright dust pan” is a real thing of beauty.
Having now moved into my ultra tiny work shop, there is really no spare floor space that you can push sawdust and shavings out of the way, and so as dumb as the this post may sound, I really do “sweep a lot, and it is part of the rhythm of my day”, but it’s not so bad if I’m not down on my knees when I’m doing it.
People, well woodworkers at least, seem to get defensive if you question the value of their preferred bench vise. So it can be difficult to get an objective opinion about them. I’m sure I am no different but I’m going to share about mine a little anyway.
About a month ago I was listening to a podcast (I just discovered podcasts) on the topic of vises, and it seemed that all three of the hosts had had nothing but bad experiences with them although they all also admitted that they were old, and were not in good repair.
They proceeded to point out some of their concerns with this style of vise and I found many of them rather interesting.
But first I should acknowledge that there are many types of face vises out there. I’ve seen them entirely made of wood, a wood chop with steel guide bars and an acme screw, and a full steel vise that you can add wood pads or a proper wood chop if you wish. I can really only comment on the steel vise as that is what I have experience working with.
So first issue? Face vises wrack. Boy do they ever!
I recently got the chance to hang out with a woodworker that I had first only known via the Internet. He had both a face vise and a tail vise so I asked him about them. He said that his face vise wracked so much it was almost unusable.
It turned out we had the same vise, so I suggested that he try tightening the bolts to the guide bars. He looked at me skeptically, but I do hope he tries it.
The next complaint is about the guide bars. It seems they are always in the way.
Not to pick on Paul Sellars, but in the way he uses a vise, I can see this being a very real issue. If all you do is add a wood pad or liner to the inside of the vise you would only have a couple of inches of the jaw that is clear of those darned bars. You can solve this issue taking Paul’s mounting design and throwing it out the window. It works for him, and if you like it who am I to judge, but in my view it looks a useful as a parka at a California beach.
First you need to mortise the back jaw into the bench. I used a powered router. This can get a little crazy since you really kind’a need to do it in one pass at full depth. It’s slow and at every second you wonder if there is going to be a fire, but in the end it is worth it.
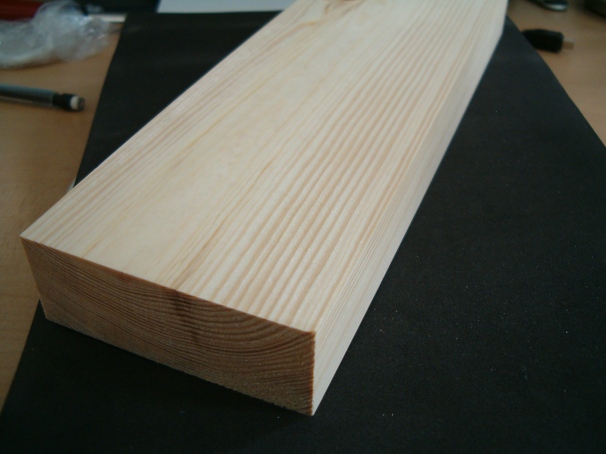
The next step is to add a wide chop, and that is pretty easy.
Here I’ve clamped a 6-1/2″ wide board. It’s fully supported, and the only limitation to its length is the height of the bench.
Since the bolts on the guide bars are tight there is very little wracking. I also planed the chop so it is skewed just slightly. You can see above that the chop makes contact at the outside right first to accommodate the little bit of unavoidable wracking.
The end result is a sickeningly strong grip on the board.
This vise is not for everyone. It’s not the cheapest option but other than the mortising it’s just a matter of bolting it to the underside of the bench.
I recently sold this vise along with the bench because I just moved and the price to ship them was almost the value of them. I’d like to try a different vise just to see the difference, but I’d be lying if I said that I didn’t kinda just want to get another steel vise.
Well that’s a little over dramatic even for me. And really “lost” is not even the right term. Now sold however, sold is more appropriate.
This week I sold a friend and teacher.
Seeing as slavery is not legal in Canada, obviously I’m not talking about a human teacher (real woodworkers are self taught), and my invisible talking dog is neither a great teacher nor of any significant monitary value.
This week I sold the workbench on which I’ve learned almost every woodworking skill I have.
Workbenches should not be teachers. Woodworkers should be teachers, and aspiring woodworkers should see their benches as teacher’s assistants.
But we all know that woodworking is a solitary hobby, so real woodworkers hide themselves in their basements alone, avoiding contact with other woodworkers unless it involves wifi.
The Internet is great, but it is worthless until it is put to test on the bench. The problem is the Internet can’t phisically walk you through the steps of a new skill. It can’t point out to you when you completely miss understand the directions and completely blow the process.
I appreciate that my old bench was there for me as I struggled to learn. It was patient as I ran back to my computer to try to decifer what I did wrong.
I’m sure if that bench could talk like my imaginary dog can, it would remind me that if God wanted woodworkers to get together, he wouldn’t have invented the Internet.
EDITORS NOTE *** This post is experiencing 3rd party photo hosting “issues”, that will be addressed as time allows. ***
Tool chests are stupid!
There.
I said it, and it feels good.
I literally don’t like tool chests, but I also don’t really like to brush my teeth. However, like having teeth, owning tools may require some things we don’t like. I also don’t like, no screw that! I HATE top lifting lids. What a stupid idea! If you have a 12″ deep chest, you lose at least 12 inches of valuable real estate directly above the chest. Then you have morons that do these sloping lids that turn 12 inches into 15 or more inches.
It’s a fool’s paradise.
Sooo… With such strong opinions about this topic, how did I get here? Well I’ve been designing the perfect tool chest/box/shelf/backpack for nearly 15 years now.
After my first day as a trim carpenter, I went to Walmart and bought the largest Rubbermaid container I could wrap my arms around to hold all my new tools. It was perfect because I was certain that I could fit all my tools in it, and I could make just one trip from the work site to my truck at the beginning, and end of the day. Once I carefully fit all my tools in that tub, I discovered that I couldn’t much more than drag the blasted thing.
It was frigging heavy.
The next day I’d replaced the big tub with two smaller tubs and a 5 gallon bucket. It took me 3 trips now, but there was no risk of needing surgery after lifting any of them.
When the world rediscovered the monstrous/traditional English Tool Chest, my first thought was that it had the same problem as Gigantor the Rubbermaid container. It’s not portable, well, not with a one man crew at least. I recently learned that the awesome size of these chests was intentional so thieves would have to team up to steal them, and since thieves are not great at sharing, they would often get caught. Well my tools will stay safe by staying with me, so the ATC is dead in the water.
When I first got into hand tools, I tried making different styles of small tool cases that fit the tools I had at the time.
But then I’d buy a new tool and the case was suddenly too small.
In the past couple of years, the DTC has found overwhelming popularity. I immediately approved of its lower half, but despised the upper half due to its massive gaping top lifting lid. The lower shelves with the removable front face was perfect. However the DTC had become so trendy that I felt like spitting every time it was mentioned.
What the world doesn’t need is another “I made a Dutch Tool Chest” post, I thought.
Now If you just have a couple of shelves for a tool chest, you will have a great place to store your block planes, smoothers, a plow plane, and what have you. But at some point you will start looking for a home for, oh, I don’t know… Perhaps a jack plane or a jointer. Oh, look I own saws as well…
This shelf idea falls flat on its face with these tools.
So let’s soften our stance a little on this top lid idea a little. Sloping lids are stupid, but I could live with a simple flat-topped lid.
Hey, a tool rack to hold my chisels, and screwdrivers would be awfully nice on the back. Ya, that is a good part of this lidded chest idea.
Hmmm. My chisels are kind’a tall. This is going to be a rather deep chest if they are going to stand on end like this. Well they fit so nicely there on the back, I think it will be worth it.
Hmmm. The front of this chest fits my longer planes really well, but with a flat-topped lid, there will be tons of space above the planes, and reaching over the high front is going to be awkward. It may be better if I lowered the front a little…
Ahhhh Crap! How did that lid get sloped?!?
Through years of struggle, I finally accepted that the Dutch Tool Chest despite it trendiness and idiotic sloping lid, was actually very well designed.
Well it’s at least half well designed.
It’s still a little too big and heavy.
I know people will argue this point, and say “what are you talking about? I can lift my DTC. You are just a wimp”
Well just being able to lift something does not make it portable. Being able to lift your chest off one stool and set it down on another stool does not make it portable either. It makes it moveable.
My shop is in the basement. To get to my truck I need to get the chest out of the shop, up the stairs, down the hall, out the door, down the stairs, and up the driveway. The large DTC, and even the smaller DTC are not especially portable in my opinion.
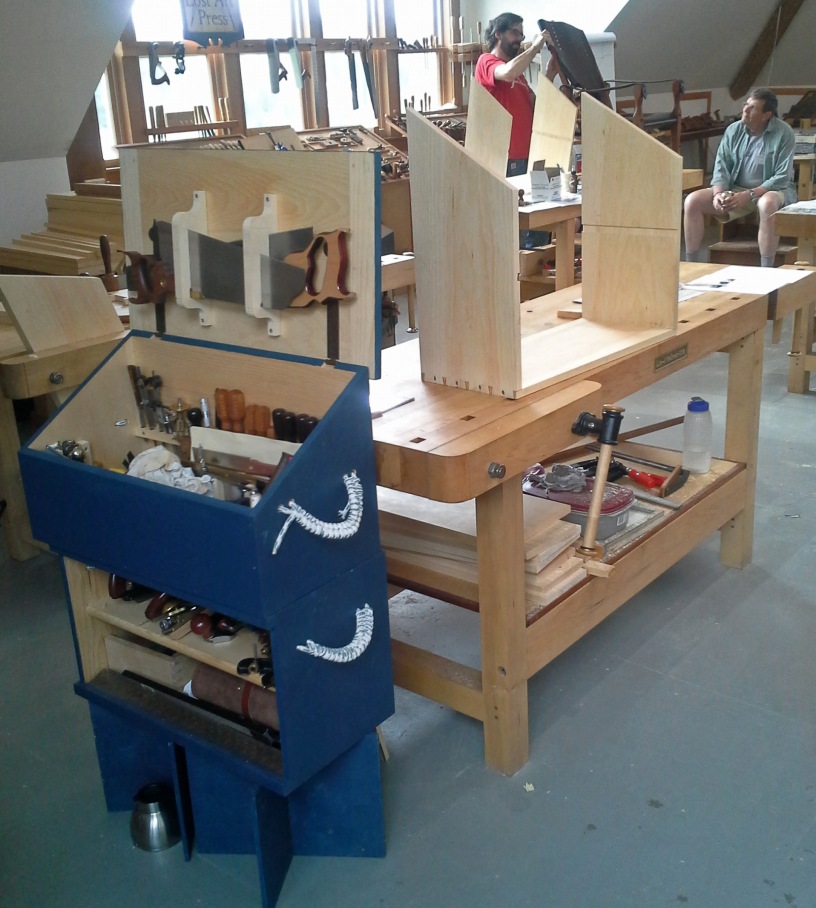
That’s why I decided to go Dutch.
If you haven’t noticed, this chest is really two chests stacked on top of each other, just like my two smaller Rubbermaid tubs. You may also notice that the top chest is a little wider than the lower one. I know this may bother some, but it’s for a reason.
The top one is 27″ wide so that it can fit saws on that darned sloping lid. The problem with that is many door openings in many houses are for 30″ doors. Most door openings also have a 1/2″ thick door stop on both sides of the jamb reducing the opening to 29″. A wide chest is a problem in a small doorway.
In the lower chest, most of the tools are stacked side by side. The longest tool in there is my framing square, and it is only 24″ long, so I was able to get away with just over 25″ wide. That makes it just possible to walk through most doorways with out scraping my knuckles.
But there is more.
Part of portability, is being able to bring as much of your workshop with you as possible. I built a simple stand that the chests sit on that also makes the top of the lower chest just the right height for free hand sharpening.
That’s right!
My tool chest is also a sharpening station.
How cool is that?
I’ve already talked about the sweet rope handles, so I’ll just let that alone except to say that the upper chest handles still need some tweaking, and have not had the ends trimmed yet. I’ll get to that… or I won’t.
And finally the gravity latches.
Once described as a “Cool locking system”, is not really that big of a deal. Almost every fence in the free world has a latch on its gate that utilizes gravity to make it latch. The idea was simple. Getting it to work in all levels of humidity was the real challenge, and resulted in the guts of it looking a little less “realwoodworker”ish than I would have preferred.
I’m still making friends with this whole tool chest idea, but I think I’ve come up with a chest that I might one day come to tolerate.
Editors note – It’s been over a year now. I’ve posted recently about how it has performed HERE.