Fair Woodworking

June 27, 2018

Don’t do the Mongo Mash

Filed under: Fair Woodworking & Hand Tool Blog,Favorite tools,Skill development — fairwoodworking @ 1:36 pm

One of my favorite terms in blogging is “Ham Fisted Woodworker”. To me it has many meanings, but for today it refers to how we all can just turn off our brains in hopes of achieving fine woodwork by way of brute force.

Using a mallet of any kind paired with a chisel is a complex algorithm of weight/force/mass/and powdered unicorn dust. I won’t pretend to understand it, and I’m also not going to allow any “It’s simple physics” talk either.

What I can simplify it down to is this. When you hit something, it will either collapse and absorb the energy, or it will resist collapsing and transfer the energy into forward motion.

I’m not a Physics Major so relax! I’m close enough to get through this post.

Chisel handles dent or split when more force is applied to the handle than the wood the handle is made of can transfer into forward motion.

A couple of weeks ago I finally fired up a 1/2″ mortise chisel I bought nearly 10 years ago, and went to work with it and my 3lb sedge hammer. I was surprised to notice that the chisel handle quickly started showing dents. Why was this happening? While wondering that I had a flash back to the time I watched a friend mushroom a chisel handle in front of me. He wailed on that poor chisel like he’d found it in bed with his mother.

And that’s when it occurred to me. Mallets don’t ruin chisel handles, Ham Fists do.

The design of a chisel is for it to cut. It will resist cutting if it is too dull, or if you try to take too big of a bite. Your chisel handle will dent when the tip of the chisel is saying “I can’t cut through that”, while your ham fist is saying “THE HELL YOU CAN’T”.

Don’t be a Ham Fist.

And use whatever kind of mallet you want.


May 30, 2018

Fairwoodworking What’s in the Name?

Filed under: Fair Woodworking & Hand Tool Blog,Skill development — fairwoodworking @ 4:30 pm

When I started this blog over 6 years ago I told nobody about it. Sometime in the first year my good friend Steve stumbled on to the blog while researching a tool and put 2 and 2 together. From there a number of people have “decoded the mystery” or I have met in person, but that has all been an unexpected blessing of this pho-humble blog hosted by WordPress. (side note. The WordPress spellchecker does not recognize WordPress as a word…)

It was never expected that I would one day introduce myself to other woodworkers, and then watch their eyes light up when I added, “you might know me as Fairwoodworking”. The truth is, that was the opposite of what I was trying to do when I started this.

This blog was intended to be totally Anonymous.

Not in an anti-social way, I just didn’t foresee at the time, that I’d ever come face to face with with another woodworker that would have seen these words.

So what’s in the semi-anonymous name of Fairwooodworking?

Have you ever had a non-woodworker look at something you made, something you cringe at every time you look at and have to smile as the non-woodworker tells you that “This IS some FINE woodworking!”?

Of course you have, because they then had to awkwardly smile as you point out all the mistakes you made, and that is why every blog, podcast and woodworking author has told us that we don’t need to point out our mistakes to others.

My name has nothing to do with the magazine Fine Woodworking. I have always regretted that obvious association. It is not a slight against them or a thumb of the nose towards them.

The name was intended as a sober recognition that the term of Fine Woodworking is more of a long term goal for me. A realization that my best today should not be my finest work but only the best I can do at this time. That hopefully, in comparison to what I will be capable in my last days, today’s work will qualify as only “fair woodworking”.

Six years later I feel, that while I’ve discovered that there is a socialality to what just started as a name, it has come full circle in a lostness in woodworking.

While the bulk of the woodworking world is mesmerized by epoxy pouring out of a five gallon bucket, there is very little excellence in the finished product. Sure there is much skill required to do this well, but do you really think in a hundred years, will anyone will sell tickets to view the greatest live edge river table known to man? Will there be a “Henry O. Studley” of epoxy?

Who will be the woodworking Virtuoso of this age?

Although I didn’t have the words when I started this, if I was to name this blog today, it may have been called “In Search of Virtus” although that is a bit of a mouthful and I’m not totally sure how to pronounce Virtus.

At the age of 46, I must concede that Virtuoso is out of my grasp. Chances are nobody will ever pay to line up to view my works behind glass either. I cannot hope to see others handle my craftsmanship with white gloves while others watch in hushed silence, but that does not mean I can’t strive towards that goal. I joke around here and on other platforms a lot. I mock the work of others that I don’t think are doing their best work. I often make some of the silliest projects to poke fun at others, but at the same time, my jokes have been some of the most challenging projects I have ever attempted.

There is a thrill to looking at a project that common knowledge says you need “these” tools to build, and asking the question, “can it be done safely without them?”.

Can I exchange “those” tools for this set of skills?

Can I make the argument that, for example, the absence of a lathe is no excuse for the inability to build a uniquely shaped folding stool?

Or to turn a pencil?

Remember the old argument against the things that Norm made on The New Yankee Workshop was, “I could make that too if I had all those tools”.

My argument for any project is becoming, “I could make that too if I develop the necessary skills”.

And that is what’s inside the name fairwoodworking.


April 22, 2018

Lathe Free or Die. The Making of a Folding Camp Stool.

Filed under: Favorites,Skill development,Things I've made — fairwoodworking @ 8:05 pm

And there you have it. It’s just that easy…

But let’s back up a little bit.

This all started quite a while ago. Having just finished a second Nicholson bench that I finally decided to add a toothed plane stop, and quickly discovered that it is by far better than any plane stop I’d ever seen or used before.

It got me thinking. Nay wondering about all the things I might be able to do that I’d found rather tricky with my old plane stops.

It started out as just a leg. How could you make an octagon leg look a little more distinctive?

Distinctive yes, but rounding consistently on 8 sides and then mirroring it again on the other side is tough, and the octagon really shows inconsistencies!

Still tricky, but if you pare in straight lines, it’s a lot easier, although at this point, it was clear I needed a lot more practice at a skill that can be a little tedious. I think it was around this time that the idea of actually making a camp stool had come to life.

Having completed this foot I’d pretty much given up on perfection, and decided to move onto production, but thankfully through some gentle critique of people I respect, I was reminded that I should expect better from myself.

Later that night, I tweaked that last leg a little and felt a bit better about it. That was the boost I needed. It wasn’t there, and frankly “there” is probably beyond my reach, but it was an improvement.

Over the next couple of days I got a new design in my mind, I wasn’t overly hopeful about it, but I figured I’d give it a try.

I got a little distracted on the bottom trying some other late idea, but I liked the original idea. It’s good to feel good about a design. It’s not perfect, but for a guy that does not excel at design, we’re going to call this a win!

Next problem…  This sweet Lee Valley hardware was designed for a round leg.

A lathe makes all this easy, but this had become an exposé against our dependency on lathes in woodworking. Careful chisel work made for a nicely rounded area on three points, but not affecting the forth. Take that Lathes!!!

With a wee bit of confidence under my belt, it was time to dip into the project wood.

Side note. I guess you could say that’s kinda like some live edge slab, and no epoxy in site!

Obligatory gratuitous walnut end grain shaving shot…

I cut the blanks over size so I could cut them to size minimizing the grain run out.

It had been a while since I’d worked with walnut. What a great wood!

Remember the plane stop? It makes this simple jig work amazingly.

So here is the most difficult part of making these legs. Getting the first side right sets the whole leg up. When you want three legs the same, you want to get this step done on all three so you can ensure that they all match.

Obligatory gratuitous grain closeup shot…

The process is a long one. It’s faster to do as much as you can with a chisel, but at some point you need to incorporate a plane to flatten things out.

Not flat…

What a happy day it was when this most technical and painstakingly difficult step was done.

So what happens when you don’t own a drill press?

You find a way.

We don’t need no stinking drill press.

My reward for some drilling well done was some easy paring to finish the feet.

Pixie Feet.

The basics of the leather work is pretty simple. Make a template.

Cut it out. One thing I learned too late was, cut with the knife 90 degrees to the template. Don’t tilt. You’ll understand the first time you try it.

There are templates for all this stuff if you take the time to search them out. I decided to just figure it out for myself. My one tip for this is that I think I’d have preferred the holes a little further from the edge. That way I would have had a little more material to trim the edges flush. Again, I’m sure you will see what I mean on your first try.

Dyeing the leather was pretty uneventful. This was my practice piece.

The rivets weren’t too bad either. The rivet setter had a burr rounder, but it was so rough I decided to try my hand at peening them by hand. Having a nicely polished hammer head makes for a cleaner finished product. More practice would make for a better finished product.

I used my card scraper burnisher to burnish the edges. Not the right tool, but it did ok.

Finished.


It even passed the stress test.

If you’ve ever thought about making one of these you should. With a simple octagon leg you could bang one out in a day or two if you are a fast worker. This whole process however, along with all the practice pieces, was more like 4 months.

#LatheFreeOrDie


April 13, 2017

The 3 Minute Dovetail Challenge

Filed under: dove tail,dovetail,Fair Woodworking & Hand Tool Blog,Skill development,Video — fairwoodworking @ 8:13 pm

Seven months ago I got a little hooked on cutting fast dovetails. You may think it’s silly, but it’s no different that racing the 1/4 mile or timing how fast you can complete a level on your favorite video game. Shortly after I started, I competed in the WIA Handtool Olympics and was very surprised when I won the Dovetail competition with a time of 5 min 41 sec.  That is a good time, even a very good time, but for some reason I didn’t believe it was what should have been a winning time. I’ve written before about how I’m not really comfortable with the idea that as a joke, I have blown way out of proportion.

You do realize you are reading the immortal words of The Champ right?

By the time I’d returned home from WIA, I’d become very dissatisfied with my accomplishment, although I was still thrilled with the Bad Axe Saw I won! I knew I could do better, I needed to do better to feel that I’d earned one of the nicest saws I’d never paid for.

Since that time I’ve cut countless dovetails in secret. I’ve studied tape both my own and that of the masters, I’ve tried new techniques, and reworked old ones. Really, I’ve a little bit obsessed on a silly little task to see what I, an ordinary guy with very ordinary skills, could do.

I had to bite my lip when I discovered that a regular guy could get under the 4 min mark. I had to sit down and stare at the wall for a while, when I reached 3 min 30 sec, and wonder how this was possible. I remember the day I discovered that I was just 9 seconds short of Mike Siemsen’s time, and had to go back to re-watch the video to be sure it wasn’t running slow. (In Mikes defense, if you have ever really watched that video, you will see that Mike made a couple mistakes he’s probably never made in the past ten years, and had it not been for that, he would have come pretty close to Franks time.)

Somewhere during this process, I had passed that arbitrary number that I thought was a “respectable” winning time, but there was still the Holy Grail. My hero! Frank is the supreme grand poobah of dovetails.

And that was my White Whale.

When you get in to the 3 min mark, every movement counts. The 3 min mark is a time I hit a lot for a good long time. Really after that point you feel like you have to take the rotation of the earth into account to improve. 2:36 is a time that I knew had the potential to elude me for years.

If you’ve watched the video you now know that just about anything is possible.  As I mentioned in the video, it was just a test run. I’d hit a bit of a wall and as I mentioned, I have found that recording a run gives you a chance to see what you are doing wrong.

Apparently I did something right this time, but I also saw some little nagging issues that I’ve been working on resolving.

I know I goof off a lot here on the blog and on other forms of social media. I talk a lot of trash, and claim to be some big shot. I’m just having fun. Most of what I say is at best a partial truth, but this next statement is as real as I can make it.

There is an amazing amount of skill locked inside of your hands. It will remain locked until you put in the work to release it. No amount of positive thinking will do what a little hard work and determination will do.

You can’t because you don’t, not because you don’t believe. Belief comes from seeing the accomplishments you previously thought were impossible.

I’d also like to give a shout out to those of you out there in Instagram land that seem to have grabbed a hold of this idea and are diving into this challenge already. Watching you guys (hopefully one day it will include some girls) fills me with glee. Let’s make the next Handtool Olympics a blood bath of killer times!

April 9, 2017

Consider pins first with a withering eye

You are not getting any younger. Unlike myself who is ageless and perfect, you are getting older with every word you are reading. And so, I don’t want to waste anyone’s time with same old arguments in pins vs tails.

Actually that’s not true.

Although whenever I’m looking to make a dovetail look or fit really good, I’ll pretty quickly go to tails first. But in the case of the historically accurate dovetail, good enough was good enough for 99% or possibly even 100% of the time. I think perfect dovetails, as much as I love them, are a modern misinterpretation of a historically un-exotic joint.

Recently while discussing the low Roman work bench the thought came up that on such a low bench, it’s nearly impossible to transfer from tails to pins because it’s so low and doesn’t have a vise.

So there you go.

Strike number one for tails-first. You need just the right type of bench to transfer. Conversely you could transfer from pins to tails while sitting on the sidewalk nearly as easily as any of your most functional workbenches. Now that I think about it, I can hardly think of a step in tails first that doesn’t call out for a better tool or a slick new idea to make the next step easier. You need a vise, and some thing to rest the tail board on while you transfer so the other end doesn’t wobble in the air. You need shallow rebate, you need a thin marking knife, you need dividers. And that all seems odd seeing as they are promoted by being easier than pins first because you don’t have to perfectly cut to the lines on the tails.

As true as this is, I gotta stop you for a sec…

Are we not woodworkers? Are we not to at least some degree Handtool Woodworkers? Have we not belittled power tool only types with how we don’t need to know the angles of cuts because we just strike a line and cut to it? Is not the line of the dovetail striken, striked, struck… for our sawing pleasure?

Yes, with all the gizmos, tails first is easier for beginners, but you should only be a beginner in the beginning. Once you get some experience, sawing to a line shouldn’t be that difficult. We really need to get past this very weak argument.

Ever try to saw to a knife line in bad lighting? That’s right. You need a work light to get that sweet raking light. But you only need the raking light for the knife line. In most woods a pencil line is easier to see, especially as you get older and your vision starts to fade. But a pencil won’t fit between the tails when we do those smart looking narrow London pattern dovetails. Not a problem if you’re pins first.

It’s just a thought.  I’m probably wrong. But what if the predecessors of our hard core pins first advocates didn’t really care what method was easier for the apprentices to learn. What if what they really cared about was that their method be possible no matter where the next job took them. Good bench, no bench. Good raking morning light, or a grey cloudy day. Young clear eyes of an apprentice or the weak old eyes of the master.

As I’ve gotten older, and I resisted accepting that I may need reading glasses. Switching to pins may be worth considering for my withering eyes.

Ahh… Who am I kidding? I got two work lights. I can see anything!!!

And this bench! What can’t it do?

And that reminds me!

Why the Hell would I be transferring pins OR tails on the sidewalk?

Honestly? I don’t know if I ever will strictly choose one or the other.

January 26, 2017

5 Dovetail Techniques and Tools You Don’t Really Need. 

As the Undisputed Dovetail World Champion, I feel that I have a duty to give back of myself to the dovetail world. It’s the least I can do to with the position I now hold.

Ha, ha. Ya right.  Just as soon as I’ve finished getting my nails done.

Really I’m just thinking back to when I first dreamed of the day I’d be a real woodworker that knew the “Dark Art” of dovetails. It’s funny now how mystical they seemed at the time. One of the reasons they seemed unobtainable was that it seemed to require so many tools. I’d attended the demonstrations, watched the videos, and I’d sat through the sales pitches. I did the math on what my first set of dovetails would cost in tools, and at over $800.00, I’d still be without a workbench, a marking knife or even a mallet.

It took a few years to be able to afford all the tools in the “beginner” set, but along the way I managed to find an affordable mallet (no longer available), and a marking knife. $500 later I had a usable workbench as well.

All told, it must have been about 5 years from the day I discovered the idea of dovetails to the day I cut them, and that’s just silly.

It didn’t need to be that complicated.

  1. You do need a workbench, and if you don’t have one, I’d highly recommend downloading The Naked Woodworker video. Had I just had access to this one resource when I first started, I’d be years ahead of where I am now as a woodworker.
  2. You will need a vise, or holdfasts like are shown in Mike’s video above.
  3. You need a Dovetail saw. Duhhh…. You can’t go wrong in product or price with the Veritas Dovetail Saw
  4. You need a Chisel. Ya, just one chisel, if you have a set already, please don’t throw the rest away, but if you don’t, just get one 1/2″ chisel. That’s all you really need to get started. Again, you can’t really go wrong with Narex if money is tight.
  5. I like using a Fret saw to remove the waste. Rob Cosman sells a pretty good one on his web site,  although I’d personally pass on the Hockey tape…
  6. You need a square. Would you believe you can lay out your dovetails with just a square? Ya! I’ll show you how later, but even the angles can be laid out fairly accurately with just the tip of your finger and your average square.
  7. You need a pencil. I like using a mechanical pencil because the mark it leaves is uniform. It never dulls, so it fits everywhere the same, line after line, after line.
  8. You need a mallet. NOT a carvers mallet, and NOT a hammer. I like a larger mallet, or even better, a mini sledge.

Oh and one last thing…. You NEED flat and square material. As a beginner, this should be the most challenging thing to get your hands on, but the flatter and the squarrrr’errr your material, the better off you will be.

That’s it. That’s all you really should need to get started, but there are other tools you will see out there, all of them I use regularly, that you don’t really need to have to get started.

img_3954

  1. Dividers – Dividers are great, but they add steps to your layout. If money is tight, you can get by for now without them.
  2. Rebate plane – First introduced to me as the “140 Trick” it’s used to make a shallow rabbet on the back of your tails. This aids in holding them against the pin board so it doesn’t slip while transferring the layout. It’s a really good trick when done properly, but Rebate planes are tricky to set up, and learning to use them well can be a hard learned skill. Again, it’s a great trick, but if done incorrectly will make learning dovetails all the more difficult.
  3. Marking knife – I found using the marking knife the most difficult skill to master with dovetails. It’s a real trick to mark all your lines accurately without accidentally moving the tail board out of alignment, and really that is a big reason people use the 140 trick. If you just want to cut some dovetails, the transfer is way, WAY easier with a pencil. You can learn how to use a marking knife later if you want.
  4. Dovetail marker – Remember how I said you can layout your dovetails with just a square? I’d much prefer to use and Dovetail marker as it is way easier, but if you don’t have one yet, don’t let it stop you.
  5. Marking gauge – You use a marking gauge to create the base line for your dovetails and also your pins. I have a few of them and they are great, but lately, for through dovetails, I’ve just been using my chisel.

Again, they are all great tools to have, they are all very, very useful, but you don’t really need them to learn how to cut your first dovetail.

If you would like to see how you can cut a reasonable dovetail with just 8 simple tools, I made yet another dovetail video.

Enjoy…

December 18, 2016

Photography for Woodworking Fools. Got’a’light?

Filed under: Fair Woodworking & Hand Tool Blog,Skill development — fairwoodworking @ 10:53 pm

Well the year is almost over and I find that of the three topics I promised to write about, I have written about exactly none of them.

Shame, shame on this bad little blogger, so with a micky of rum in hand, here we go…..

About a year and a half ago I wrote about some of the things I’ve learned about taking pictures in the shop. It has been one of my more well received posts, so I thought I should add a little more, especially since I really botched one of the tips. For years I’d just used my work light for all my lighting needs, because I thought that having proper lights would be too much of a hassle for the benefit they would allow.

And that broke a very important rule in my shop.

Only have opinions about things you have tested and proven to be true or false.

After acknowledging my sin, I ordered the cheapo set recommended by Chris Schwarz, and have been using it for about a year. For starters, it is as horribly cheap as it ever could be. However they do work, and so let’s go ahead and see what I think about them in my shop.

But before we do, if you only have the money for lighting or a tripod, screw the lighting. FOR HEAVENS SAKE GET THE TRIPOD ALREADY!!!

Anyways, what really discouraged me from getting a lighting set was how much trouble just having a tripod in the shop was. They have a very wide base and in a small shop their legs are always just one inattentive step away from tripping over. Then there is storage. Opening and closing, finding a spot to keep it where it wont fall and break. It sucks, it’s a pain.

It’s worth it.

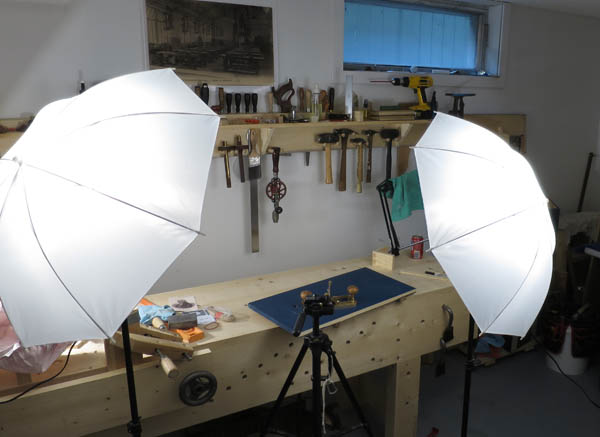
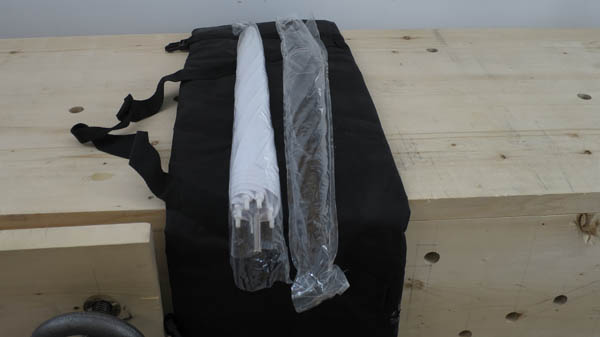
This set comes with two floor stands and one smaller stand, three fluorescent lights, two umbrellas, and an utterly useless case. Forget about the case, I did, and had a problem finding it so it could be in the picture. Again, forget about the bag, it is the least of the issues, but don’t get me wrong, as bad as this set is, I don’t hate it, as bad as it is, let’s move on.

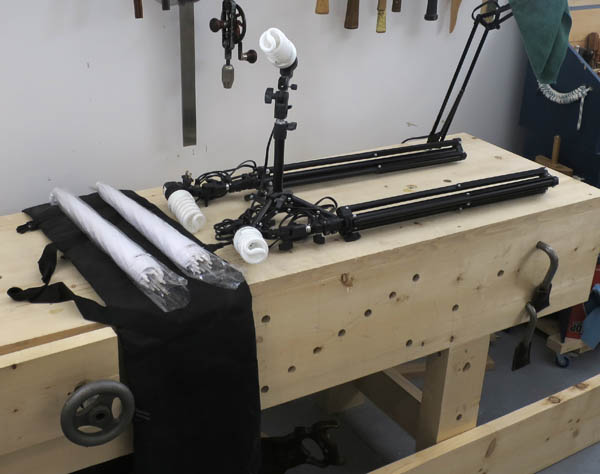
The build quality of the… well… everything is as horrible as it can be for the price, but with a little care I’ve managed to get by.

What you see before you is a bunch of cheap plastic that is just daring you to over tighten a knob until it prematurely snaps. Handle with care.

See that one smaller round knob?

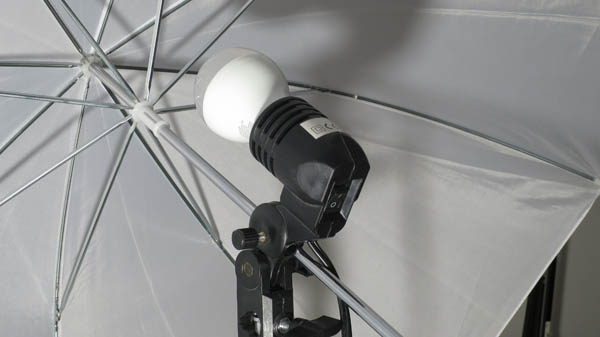
It holds the umbrella, and by hold, I mean leverages against the umbrella rod in hopes that it can split the head apart. DO NOT TIGHTEN THIS KNOB. Get it close, and then notice how the power cord hangs against the rod? That will hold the umbrella in place in most cases. If not, some tape or something. That will work better than the mini knob of destruction.

The stands themselves are also very light duty, but with care not to over torque them open too quickly, they should be ok.

I’ve read some reviews that complain that this set does not have the lighting capacity they had hoped, and it’s true with three 45w bulbs, it’s a little dim, but since we are all good little boys and girls who use our tripods, we don’t have to worry about that. The trick is to get a good balance of light vs shadows for the shot you are after. You can compensate with the camera if you have a tripod.

I did however change the bulbs to get a little more light mostly for video. In my original post I said that I used an old-fashioned 100w bulb in my work light, but the problem with incandescent bulbs is that they get really hot, and that is not ideal when you are setting up light stands, for a quick picture and then tearing down again. Also that amount of heat could melt the cheapo plastic.

Stupid cheap plastic.

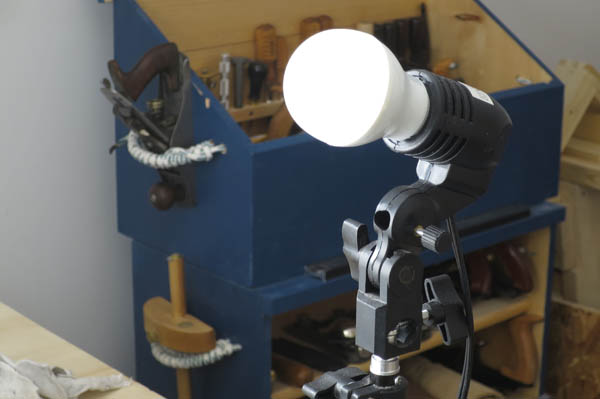
In the end I chose to switch to LED bulbs, but when considering this change, it’s a really good idea to consider what color of light is in your shop.

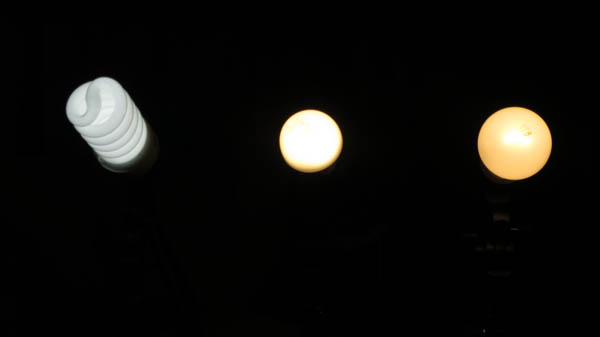
On the left is the fluorescent bulb from the lighting set. On the right is my old 100w incandescent. In the middle the LED light that I now have for all my shop lighting.

The color of your lighting is very important for photography. Your camera can adjust for the color of your lighting with the setting called “White Balance”, but only for one color. Many bulbs now will have a color rating in units of the Kelvin scale. A high number will be whiter (colder) a lower number more yellow (warmer). The fluorescent bulb here is rated for 5500k, the LED 3000k, and the incandescent is probably 3200-3500k(?).

Anyways, I prefer a warmer light to work in so I switched ALL my lights to the same 3000k bulbs. Unfortunately, I’ve not been able to find them in more than the equivalent of a 60w.

The bottom line is you will get better richer color out of your pictures if all your lighting is of the same color. Keep in mind that there is a Kelvin rating on sunlight as well. Unfortunately it varies through the day, and also in different weather. I prefer photography in my shop after dark since I never get enough sunlight to not need electric lights.

With our choice of bulbs made, what’s the deal with umbrellas?

Well the problem with using my work light is that it has a very direct light. It’s great for working but it causes very harsh shadows, and very concentrated bright points. The lighting stands with the umbrellas diffuse the light. It widens the angle of the light source, and softens both the shadows, and also the lighter, more reflective areas.

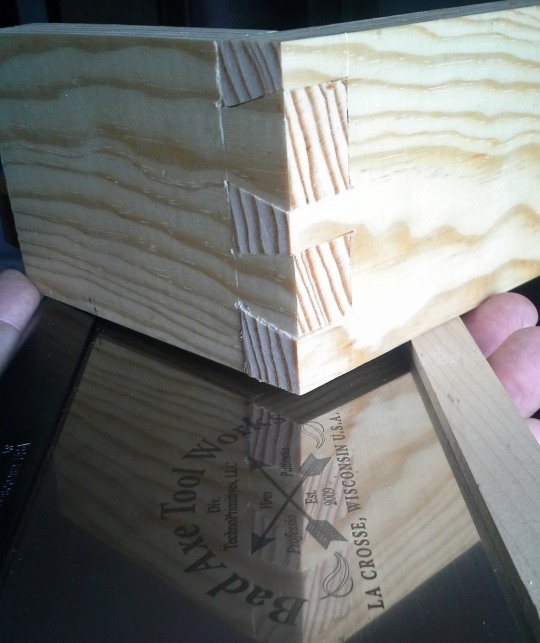
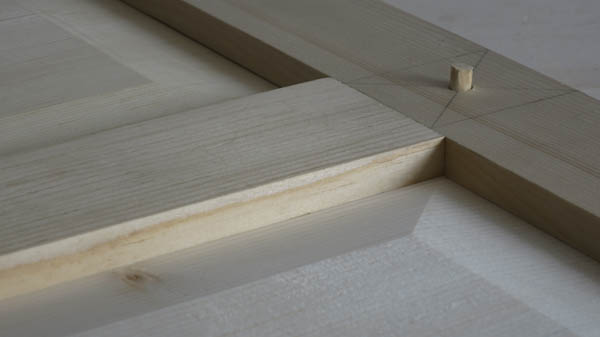
Here’s a great example.

Look how over exposed the top of that piece of wood is. At the same time the toe of the saw is almost lost in the shadow of the dark room. There is nothing pleasant about this picture. The over exposed areas and glare is distracting. Shame on me for ever taking this picture! Even worse, I posted it on Instagram. Yuck!

Speaking of Instagram,

Here is another picture I posted there a while ago. It’s not perfect, I’m still learning as I go, but it’s just so much more comfortable.

Here’s another one.

Often times I’ll even just use one of the light stands with the umbrella set at a fairly low angle. It throws a long soft shadow that I really like.

If you use your shadows correctly, they can really help define the details in a picture.

I’m getting distracted with my awesomeness…

Each of the two umbrellas were supplied with these clear plastic sleeves. DON’T THROW THEM OUT!!! I’m very careful to always store them in the sleeves to keep them clean. Don’t touch the white of the umbrellas, and don’t leave them out of the sleeves any longer than you have to. Once they are dirty, they won’t spread a nice even light anymore, so be a good lad and practice safe umbrella-ing.

So what am I really saying?

Just like tripods. Having to set up lighting, step carefully around it take the shot, tear it down, and safely stow it away sucks unbearably, it is necessary it if you want your photography to improve. It will take practice to utilize properly, and quite possibly, it will suck the will to live out of your very soul, but in the end…

It is worth it.


November 25, 2016

That’s How We Do

Filed under: Fair Woodworking & Hand Tool Blog,Skill development — fairwoodworking @ 6:17 pm

I learned my trade from my father in Hungary. It was a pretty rough going because after I start apprenticing with my father, I had no more father, I just had a master. The first time I made a drawer he threw it in the corner. He told me, “That’s no good. You gotta be a lot better than that”. Once I learn how, then he told me, “It has to be a lot faster”, because the good craftsman not only do things well, but do it with a speed.

Frank Klausz 

This quote is from the DVD Dovetail a Drawer, available from Lie-Nielsen

061012_1

For a multitude of reasons, very few of us have a story even remotely similar to Frank’s. Apprenticeships of this nature are very rare, and few of us have fathers that are at a high level of skill to teach us. Far too many of us are Google apprentices.

By that I mean that we search for woodworking nuggets and try to add them to our woodworking from an international cesspool of woodworking knowledge/anti-knowledge. The problem is that while even if every answer Google gave you was correct, they still would lack the context of your shop, and your workflow.

For example, toothing a bench top. I’ve never tried this, but it comes from a respected source, and I would love to test it. I even bought a plane specifically for toothing, but my current bench is made of soft wood, and is wondrously grippy. With such a soft wood, I suspect that the toothing wouldn’t really add anything, and the toothed ridges would be so fragile they would simply break off. My last bench was maple and working on it was like walking on ice. Hey Brad? Be a good fellow and tooth my bench and get back to me on how it works will you? That’s a good fellow.

What I am saying is that a toothing plane has very little value in my shop.

So if Google or the forums is not a good teacher what should we do?

I really think the best thing ever would be to have a highly skilled woodworker with at fully equipped shop, that would let you work along side them, but for most of us that is a pipe dream that will never ever come true.

For the rest of us, I think the best compromise we can find is to sort through all the mess of opinions on the web and from all of that, pick a master to diligently follow. Edit – Not because they know everything. Simply because you have to start somewhere.

Pick someone you respect, one that has a proven track record of work history, especially one that shares your woodworking interests. Finally, find someone that has well documented their work so you can get an exhaustive view of their shop life, their work flow, and techniques. Edit – Someone accomplished in works, and prolific in sharing what they have learned from their works.

Pick one, and strive to follow them as closely as you can. If they use wooden planes, learn to use wood planes. If they use a bench that is pinky high, build yours pinky high. If their bench is nipple high, well…. ya, give’er a try… chances are it will work with whatever other techniques they do. Pinky high techniques will not work with nipple high benches, and nipple high techniques will seem ludicrous on a pinky high bench. Edit – Once you are well established, you will easily see a good idea that will fit your work flow. As a beginner any hair brained idea can lead you astray. 

Don’t mix and match. DO NOT MIX AND MATCH! And for heaven’s sake, avoid the recommendations of other beginners even/especially if they seem to make more sense than those of more experienced woodworkers. Edit – See edit above. This is a lesson I’ve learned over the past 10 or so years. Many of those years wasted chasing contradicting techniques.

Choose your master wisely because it will be a large investment of time and money, but so is buying tools that won’t work with your workflow.

There are not many choices that you will be able to find. I personally, would fall short on pretty much all of the criteria, but if you’ve followed this blog for any amount of time, it should pretty obvious who I have chosen to follow. If this is your first time, I pretty clearly laid it out HERE, so there is really no need to rehash it.

From there, take whatever classes you can get your hands on, and apply whatever you can that fits to the base of what you have learned from your adopted master.

Do your level best to not get distracted. It’s not ideal, but it’s better than nothing, and as you learn you will find others that will supplement fairly seamlessly to what you already have learned.

These days there are three guys that through all the white noise out there I strive to listen to. They don’t all agree on every topic, but they do for lack of a better term, “harmonize” nicely.

Chris Schwarz obviously is the first. (Resisting the urge to break into a Barry White solo…)

Frank Klausz is the second because while he is not as prolific Edit – prolific in his teaching, his down to earth and simple opinion Edit – based on his accomplishments, cuts through all the mumbo jumbo. His father said do better, so he did better. His father said be faster, so he got faster. There is no discussion about talent or natural aptitude, and I suspect that while we see him as a woodworking god, really he is just an average guy that chose to develop his hand skills. Skills that first felt foreign, diligently practiced into second nature movements, in hopes of avoiding the wrath of an impatient master. The first time I watched his videos I thought they didn’t apply because he was so matter of fact with what you as a beginner should do, that he must have forgotten what it’s like to be a beginner. Now I can see that he hasn’t forgotten a thing. In my words I’d say “we can’t, because we won’t”.


Thirdly is Konrad Sauer. Konrad is more than a pretty face, in pretty boots with long flowing hair. Konrad to me is an extension of what I’ve learned from Frank. There is almost no limit to what we can teach our hands to do. Perfection is not flawlessness. Perfection is the opposite of compromise. And no matter how skilled you get, to achieve your very best work, it will still be a little terrifying. If you don’t follow Konrad on Instagram you should.

That’s how we do!

Edit – It may seem like I’m selling myself short by narrowing who I chose to learn from. I think there are two ways to look at this. I have a limited time on this earth to learn what I’m going to learn about woodworking, so I can choose to learn almost nothing about everything in woodworking, or I can learn as much as I can about a few things in woodworking. If that means I’m selling myself short so be it. One of us is the reining Dovetail World Champion, and the rest of you are not… I’m laughing as I type this. It just never gets old, Well at least not to me. I’m such a dork! Ha, ha, ha.

And now to help the non Barry White fans get my attempt at humor…

For the rest of us, here is a great chance to watch one of the great tenors of our time die a little with every lyric he sings.


September 27, 2016

Just call me Champ

Yes I know, much has happened in the past week, and yet again I am at the center of it. I hate to brag about it since I’m sure you already know. I understand how the Monday morning water cooler talk was all a buzz about where you were, and what you were doing when you learned that Fairwoodworking became the Dovetailing Champion Of The World.

You already know about all that, so I need not mention it.

20160917_163256-copy

Well I’ve come to learn that winning was the easy part. The parades, the ceremonial mall openings, the charity golf tournaments and working the international talk show circuit (I’ll admit my Mandarin is a little rusty), meeting with government officials and running from all my new found dovetail groupies. It’s not a life I’m familiar with, but don’t worry.

I’m still Jenny from the block.

I’m not changing and neither is the blog.

Well.  Not much anyway.

I’d prefer it if you did call me Champ, and also please don’t look at me directly. Oh. And only speak in hushed tones.

The blog will remain fully accessible to all… that pay their subscription fees on time.

Yes it’s business as usual here at “Champion Of The World Woodworking”.

Did you guys catch where I compared myself to J-Low?

She wishes.

Are you buying this?

I’m certainly not.

While I greatly appreciate the donated prize of a 14″ BadAxe Sash Saw, I really don’t get how a 5:41 time with a 2 card deduction won. You can argue that I’m being modest, or more accurately falsely modest, but I assure you that you have misunderstood. I think my results under the gun, with people watching was fantastic. My only goal was to perform at a level that I could look back on and know I had done the best that I was capable of. Oh, and I really, really, REALLY wanted to better my good friend Neil Cronk.

Done, and DONE!!!

By the narrowest of margins (1 second and 4 point deductions) I win, and this time you can’t claim to have the nicer fit.

EDITORS NOTE – If the next time I’m spotted in public, I have shards of an award winning stool sticking out of the side of my head, don’t call the police. I deserved it…

The thing is I am not especially talented, and also anyone who has seen me work at anything knows I progress at a snail’s pace. I’ve been working on the same chest of drawers for over a year now, and I’ve yet to finish the carcass. The only things I brought to the table was the accumulation of two key skills, a well thought out game plan, and an average of cutting two joints per day for 14 days.

If there is one thing I can brag to the world about it’s that I came prepared, but by that logic, I should also be bragging that every day I manage to leave the house with both my shoes on the right feet.

I should not have won this event, and if I get the chance to compete again, I hope I am obliterated by one of you out there.

Then I’ll crack you on the head and steal your prize!

So let’s see if we can’t bring this in for a landing.

After the completion of the Handtool Olympics, I got a chance to thank Mike Siemsen personally for running the competition. As we talked I commented that as fun as it was to practice and then compete, such a rushed process has no real value to real life dovetails or woodworking. Mike very kindly stopped me right there and in words I have now forgotten, he essentially told me, “you’re wrong, you’ll see”. Since that time I’ve had some time to consider it, and I now believe him to be correct.

Even if you never compete in a dovetail race, you can learn from it, and in the next while I hope to share with you the skills and strategies necessary to cut a fast’ish dovetail.

The first two skills I mentioned above.

  1. Learn how to start a square cut free hand. (for cutting the tails)
  2. Learn how to cut straight down free hand. (for cutting the pins)

If you are looking at this skeptically, hoping that I will tell you that “You can do it big guy!!!”, don’t bother, you can’t.

However, if you are willing to try, and fail, and try, and fail, and keep trying until you succeed? Who knows what will happen.

Either way, hand wringing 101 is one blog over from here.

img_32131

Additional thanks to Popular Woodworking for a great Popular Woodworking in America I hope to come again next year!


HEY! WAIT A SEC! WHO SORTED THESE GUMMIE BEARS!!??!!

I SAID ONLY GIRL GUMMIE BEARS!

I’LL HAVE YOUR JOB FOR THIS!

DO YOU REALIZE WHO I AM?

I OWN THIS TOWN!

September 10, 2016

The Man in the Mirror

Short story, I’m a lame techno geek, and I’m too easily obsessed with things that probably were intended to just be fun.

See? That wasn’t so painful?

Ok. Long story?

Hand tool skill is the culmination of many finer, smaller skills that can really be a trick to pull together. As a beginner I was just happy if I didn’t cut myself. As you improve, your internal skill monologue grows, and good motions are obvious in a sea of bad motions. That is if you can remove yourself from the task at hand and watch yourself working. Unfortunately, that level of self awareness is pretty much impossible so you really only have two options. Get someone as skilled as you or better to watch you work, or film yourself with your handy digital camera as God intended.

For the past week I’ve been practicing cutting fast dovetails to compete in the Handtool Olympics at the upcoming Popular Woodworking in America, and I’ve found right off the bat it was less about working fast as it was removing every best practice that was not absolutely necessary.

img_3115

No Marking gauge

No dividers

No Dovetail markers

Marking knives are a no, and…

My beloved shallow rebate on the back of the tails?

Gone.

Heck! Tails first is even out the window since I’m pretty sure pins first is faster.

All I’m left with is a Dovetail saw (no crosscut saw), a fret saw, one chisel, a pencil and a mallet.

I feel like such a minimalist!!!

Once I got comfortable, I was sure I could be faster, so I tried to work quicker, and wouldn’t you know it? My times got slower… How could that be?

What I’m coming to realize is that speed is not about rushing so much as it is about removing the slow bits. The hesitations, the missteps. When you make a mistake or are inefficient with your movements the penalty is wasted time, and possibly the need to fix a mistake.

So I got out my camera and shot this little video. It’s pretty easy to see where I’m loosing time.

How I handle the wood, keeping track of what side is the inside, and what is the show side. – If you always place each piece down exactly how you will need it, you don’t have to rearrange later.

Hesitations and lurches with the saw. – I’d thought my sawing skills were pretty solid, and they aren’t really that bad, but it still isn’t a true extension of my arm.

Transferring the pins to the tails. – What a mess, I really need to relax at this point.

How I handle the chisel. – I’m actually pretty happy with it. I feel I’ve really improved in that part although I totally blasted past the base line on one spot of the tail board.

Anyways, feel free to have a look and see if you can pick out some of the flaws in my actions, then chuckle to yourself when you see that I split the pin board.

Ah well. It happens some times.

Who would have thought I’d have so much fun practicing?


If you want to see how the pros do it, watch Mike Siemsen go head to head with Frank Klausz.

Next Page »

Create a free website or blog at WordPress.com.